DDR3 8gB ECC Rams

How to Install/Upgrade Ram in a Laptop


How to Install or Upgrade RAM in a Laptop: A Complete Step-by-Step Guide 

If your laptop is struggling to keep up — Chrome tabs crashing, programs freezing when you switch between them, or everything just feeling slower than it used to — the issue isn’t always your storage drive. Often, the real bottleneck is insufficient RAM (Random Access Memory). The good news? This is one of the easiest and most affordable upgrades you can do yourself, usually in under 15 minutes, without needing to replace your entire laptop.

At Ababil.com.pk, customers across Pakistan ask us almost every day how to upgrade RAM in a laptop, whether it’s an older Dell Inspiron, an HP ProBook, or a Lenovo IdeaPad bought secondhand from Hafeez Centre or Hall Road. So we’ve put together this detailed guide covering everything from choosing the right RAM module to physically installing it in your laptop.

Why Upgrade Your Laptop’s RAM?


Before getting into the installation steps, it helps to understand what RAM actually does. RAM is your laptop’s short-term memory — it temporarily holds the data your processor needs to access quickly while running programs. The more RAM you have, the more applications and browser tabs your laptop can juggle at once without slowing to a crawl.

When a laptop runs low on RAM, it starts relying on virtual memory (your hard drive or SSD) as a substitute, which is far slower. This is what causes that frustrating lag when you have too many programs open. Upgrading from 4GB to 8GB, or from 8GB to 16GB, often makes a dramatic difference, especially for students running multiple browser tabs alongside Word or Excel, professionals using design or accounting software, and anyone juggling video calls while working. Unlike many other upgrades, adding RAM rarely requires reinstalling Windows or losing any of your files, making it one of the lowest-risk improvements you can make.

Choosing the Right RAM for Your Laptop


Picking the correct RAM module is the most important step. Most laptops sold in Pakistan over the past several years use either DDR3, DDR4, or DDR5 memory in the SO-DIMM form factor, which is the compact size designed for laptops rather than desktops. Before buying, check your laptop’s manual or use a free tool like CPU-Z to confirm which RAM type your motherboard supports, and find out how many RAM slots it has and whether any are already filled.

At Ababil.com.pk, we stock a wide range of laptop RAM modules from trusted brands, with options ranging from budget-friendly 4GB and 8GB sticks for everyday use, up to 16GB and 32GB modules for users running heavier multitasking, design software, or virtual machines. Pricing in Pakistan generally starts from a reasonable amount for entry-level capacities, making this one of the most cost-effective upgrades available for any laptop.

Tools You’ll Need Before You Start


This is a simple job that doesn’t require much equipment. A small Phillips screwdriver set is the main tool needed, since most laptops only require removing one or two screw sizes to access the RAM slot. It also helps to work on a soft, clean surface like a table with a cloth to avoid scratching your laptop’s chassis, plus a small container to keep screws organized so nothing goes missing. Unlike an SSD upgrade, you won’t need any cloning software or USB installers here, since your existing Windows installation and files remain untouched throughout the process.

Step-by-Step Guide: Installing RAM in Your Laptop


Step 1: Check Your Current RAM Configuration

Before opening your laptop, check how much RAM you currently have and how it’s installed. On Windows, open Task Manager, go to the Performance tab, and click Memory to see your total RAM, how many slots are used, and your RAM type. This tells you whether you’re adding a stick to an empty slot or replacing an existing one.

Step 2: Power Off and Unplug Everything

Shut down your laptop completely, unplug the charger, and remove the battery if it’s removable. For laptops with non-removable batteries, press and hold the power button for about 10 seconds after unplugging to discharge any remaining electrical charge. This step protects both you and your laptop’s internal components.

Step 3: Locate the RAM Compartment

Flip your laptop over and look for a small panel, often labeled with a memory icon, or sometimes covering most of the underside on ultrabooks. Some laptops, particularly older Dell, HP, and Lenovo models common in the Pakistani market, have a dedicated removable RAM panel. Others may require removing the entire back cover to reach the slots.

Step 4: Remove the Screws Carefully

Using your screwdriver, remove the screws holding the panel or back cover in place. Keep these screws separated and labeled if your laptop uses different sizes for different sections, since mixing them up can cause fitting problems later.

Step 5: Ground Yourself and Locate the Slots

Once the compartment is open, you’ll see one or more RAM slots, sometimes with an existing stick already seated. Before touching anything, briefly touch a grounded metal surface to discharge any static electricity, since RAM modules are sensitive to static damage.

Step 6: Remove the Old RAM Module (If Replacing)

If you’re replacing an existing stick rather than adding to an empty slot, gently push the small retaining clips on either side of the module outward. The RAM will pop up at an angle. Carefully pull it out by the edges, avoiding contact with the gold connector pins.

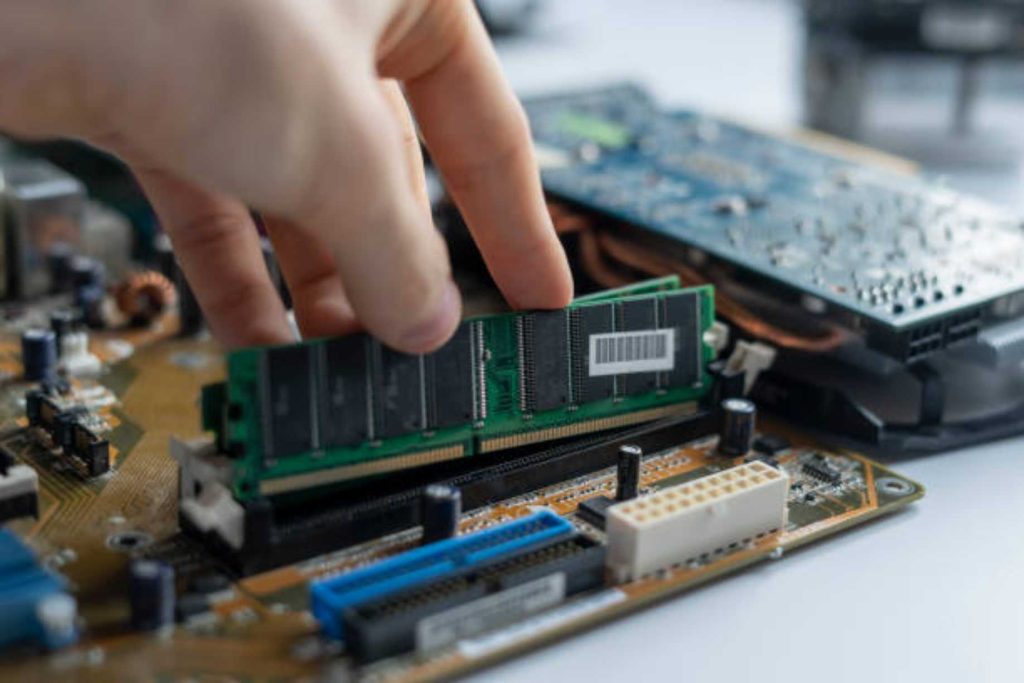
Step 7: Insert the New RAM Module

Align the notch on the new RAM stick with the notch in the slot, since RAM only fits one way. Insert it at roughly a 30-degree angle, then press down firmly until the retaining clips click into place on both sides, securing the module flat.

Step 8: Replace the Cover and Power On

Put the back panel or cover back on and tighten the screws. Reinsert the battery if you removed it, plug in your charger, and power on your laptop. Windows should automatically detect the new total RAM without any additional setup.

Confirming Your RAM Upgrade Worked


After powering on, open Task Manager and check the Performance tab again, or right-click the Start menu and select System, to confirm the new total RAM is being recognized. If the laptop shows less than expected, double-check that the module is fully seated in its slot, since RAM that isn’t clicked in properly often won’t be detected. Unlike an SSD, there’s no cloning or fresh install needed here, your operating system, programs, and files all carry over exactly as they were, just with more memory available to use.

Common Mistakes to Avoid


When performing this upgrade yourself, be careful of static electricity damage. Always ground yourself before handling the RAM module, and avoid touching the gold connector pins directly. Don’t force the module into the slot; RAM only fits one way based on the notch, so if it feels difficult, double check the alignment rather than pushing harder. Also remember to verify compatibility carefully beforehand, since installing the wrong RAM type, such as DDR4 in a laptop that only supports DDR3, simply won’t fit or work, even if the physical size looks similar.

Need Help? Ababil.com.pk Has You Covered


If reading through these steps feels a bit overwhelming, don’t worry. Our team at Ababil.com.pk offers professional RAM upgrade services along with genuine memory modules from leading brands at competitive prices across Pakistan. Whether you’re upgrading a personal laptop, a business fleet of machines, or a workstation for heavier tasks, we can guide you toward the right RAM type and capacity and handle the installation for you if you’d prefer not to open up your device yourself.

Final Thoughts


Upgrading your laptop’s RAM is one of the simplest and most rewarding improvements you can make, often eliminating the lag and freezing that comes from heavy multitasking. With the right RAM module, a few basic tools, and about fifteen minutes of your time, you can give your laptop noticeably smoother performance without spending money on a new machine. Browse our range of laptop RAM at Ababil.com.pk today and feel the difference more memory makes.


How to Install/Upgrade Ram in a Laptop Read More »

How to Install an SSD in a Laptop


 How to Install an SSD in a Laptop: A Complete Step-by-Step Guide for Users

If your laptop has started feeling sluggish — taking forever to boot, freezing when you open multiple Chrome tabs, or just generally feeling tired — there is a good chance the problem isn’t your processor or your RAM. In most cases, the real culprit is an old-school hard disk drive (HDD) that simply can’t keep up with modern software. The good news? You don’t need to buy a new laptop. Upgrading to a Solid State Drive (SSD) is one of the cheapest and most effective upgrades you can make, and it’s something you can do yourself in under 30 minutes.

At Ababil.com.pk, we get asked almost daily by customers across Pakistan how to install an SSD in a laptop, whether it’s for an old Dell, an HP Pavilion, or a Lenovo ThinkPad picked up secondhand from Hafeez Centre or Hall Road. So we decided to put together this detailed guide that walks you through the entire process, from choosing the right SSD to actually fitting it inside your laptop.

Why Switch from HDD to SSD?

Before we get into the installation steps, it’s worth understanding why this upgrade matters so much. A traditional hard drive uses spinning metal platters and a mechanical arm to read and write data. An SSD, on the other hand, uses flash memory chips with no moving parts at all. This single difference changes everything about how your laptop performs.

With an SSD installed, Windows boot times typically drop from 60-90 seconds down to 10-15 seconds. Applications like Microsoft Office, Photoshop, or even heavy software like AutoCAD open almost instantly. File transfers, copying, and general multitasking all become noticeably smoother. For students, freelancers, and office workers across Pakistan dealing with frequent power fluctuations and the need for reliable performance, an SSD upgrade also tends to be more durable than a traditional HDD since there are no fragile spinning parts that can be damaged by drops or vibration.

Choosing the Right SSD for Your Laptop

The first practical step is picking the correct SSD. Most laptops sold in Pakistan over the last decade use a 2.5 inch SATA SSD, which is the easiest and most universal option for an upgrade. Before buying, check your laptop’s drive bay size (almost always 2.5 inch for laptops) and confirm whether your motherboard supports SATA III for the best speed.

At Ababil.com.pk, we stock a wide range of 2.5 inch SATA SSDs from trusted brands, with options ranging from budget-friendly 120GB and 240GB drives ideal for basic use, up to 480GB, 1TB, and 2TB drives for users who need more storage for games, design files, or business data. Pricing in Pakistan generally starts from a few thousand rupees for entry-level capacities, so this is genuinely one of the most affordable upgrades available for any laptop.

Tools You’ll Need Before You Start

You don’t need a workshop full of equipment for this job. A small Phillips screwdriver set is the main tool required, and many laptops only need one or two screw sizes. It also helps to have a soft, clean surface like a table with a cloth to avoid scratching your laptop’s chassis, plus a small container or magnetic tray to keep screws organized so nothing gets lost. If you’re moving your existing Windows installation to the new SSD, you’ll also want a USB-to-SATA enclosure or docking station, along with cloning software such as Macrium Reflect, AOMEI Backupper, or EaseUS Todo Backup. If you’d rather start fresh, a USB flash drive of at least 8GB with a Windows installer is the way to go.

Step-by-Step Guide: Installing a SATA SSD in Your Laptop

Step 1: Back Up Your Important Data

Before opening up any laptop, always back up your photos, documents, and important files to an external drive or cloud storage. Even though installing an SSD is generally safe, it’s always smart to be cautious whenever you’re working inside your laptop’s hardware.

Step 2: Power Off and Unplug Everything

Shut down your laptop completely, unplug the charger, and remove the battery if it’s removable. For laptops with non-removable batteries, simply press and hold the power button for about 10 seconds after unplugging to release any remaining electrical charge. This step protects both you and your laptop’s internal components.

Step 3: Locate the Storage Bay

Flip your laptop over and look for a small panel, often labeled with an HDD or SSD icon, or sometimes covering the entire underside on ultrabooks. Some laptops, particularly older Dell, HP, and Lenovo models common in the Pakistani market, have a dedicated removable panel. Others may require removing the entire back cover.

Step 4: Remove the Screws Carefully

Using your screwdriver, remove the screws holding the panel or back cover in place. Keep these screws separated and labeled if your laptop uses different screw sizes for different sections, since mixing them up can cause fitting issues later.

Step 5: Remove the Old Hard Drive

Once the bay is exposed, you’ll usually see the hard drive sitting in a small caddy or bracket, often held by four small screws on the sides. Gently unscrew and slide the drive out of its SATA connector. Some laptops use a small ribbon or connector cable that needs to be carefully disconnected.

Step 6: Transfer the Drive to the Caddy or Bracket

If your laptop uses a mounting bracket or caddy, unscrew the old hard drive from it and attach your new SSD using the same screws. This bracket helps keep the drive secure and properly aligned with the connector.

Step 7: Install the New SSD

Slide the SSD into the same bay, ensuring it connects firmly with the SATA port. Once it clicks into place, screw it back into position using the screws you removed earlier.

Step 8: Replace the Cover and Power On

Put the back panel or cover back on and tighten the screws. Reinsert the battery if you removed it, plug in your charger, and power on your laptop to confirm everything is recognized properly.

Setting Up Your New SSD: Clone or Fresh Install?

Once your SSD is physically installed, you have two options. The first is cloning your existing drive, which means using cloning software to copy your entire operating system, programs, and files directly onto the new SSD, so you can keep using your laptop exactly as before, just much faster. The second option is a fresh Windows installation, which involves installing Windows from scratch using a USB installer, giving you a clean, clutter-free system, ideal if your old drive has accumulated years of junk files and unwanted programs.

Many customers visiting Ababil.com.pk prefer the fresh installation route, especially if their laptop has been running slow for a long time, since it gives the SSD a real chance to perform at its best without old baggage slowing things down.

Common Mistakes to Avoid

When performing this upgrade yourself, watch out for static electricity damage. Always touch a grounded metal surface before handling internal components. Don’t force any connector into place; SATA connectors are designed to fit only one way, so if it feels difficult, double check the alignment rather than pushing harder. Also remember not to forget BIOS settings, since occasionally older laptops need the SATA mode set to AHCI for the SSD to be detected correctly.

Need Help? Ababil.com.pk Has You Covered

If reading through these steps feels a bit overwhelming, don’t worry. Our team at Ababil.com.pk offers professional SSD installation services along with genuine SSDs from leading brands at competitive prices across Pakistan. Whether you’re upgrading a personal laptop, a business fleet of machines, or a gaming rig, we can guide you toward the right SSD capacity and handle the installation for you if you’d prefer not to open up your device yourself.

Final Thoughts

Installing an SSD in your laptop is one of the most rewarding upgrades you can make, often breathing new life into machines that are several years old. With the right SSD, a few basic tools, and about half an hour of your time, you can transform a slow, frustrating laptop into a fast, responsive machine that feels brand new. Browse our range of SSDs at Ababil.com.pk today and experience the difference real speed make

How to Install an SSD in a Laptop Read More »

Scroll to Top